If you are reading this article, chances are that you own an eCommerce business, an online business, a brick-and-mortar store, or you are simply selling digital products on social media. You could also be a tech freelancer or a newbie in eCommerce marketing.
Regardless of what you do, you are here to learn how to pay for Facebook ads in Nigeria. If you are not very used to the Meta Business Suite interface, it is very easy to get lost while creating your ad campaign.
Additionally, if you make any mistake while setting up your Facebook ad manager account, you may run into some issues when it’s time to pay for your ad campaign. But, don’t worry – we got you covered!
In this blog, we will look at how to pay for Facebook ads in Nigeria – either with your Naira card, prepaid card, or a virtual USD card. Let’s get started!
Step-by-Step Guide: Paying for Facebook Ads in Nigeria
First things first, before you can even set up a Facebook ad campaign, you need a Facebook Business Manager account (now known as Meta Business Suite).
When setting up your Meta Business account, add all the relevant business assets – including your Facebook page, IG page, WhatsApp account, and other necessary assets.
Once your Meta Business account is set up and configured with the essential assets, you’re ready to move on to the next steps in paying for Facebook Ads in Nigeria.
Let’s look at how to pay for Facebook ads in Nigeria:
Step 1: Getting Ready
- Gather your details: Have your Naira credit/debit card (MasterCard or Visa) or PayPal account information ready.
Learn how to create a PayPal account in Nigeria.
- Access Facebook: Ensure you have an existing Facebook account and access to Facebook Ads Manager.
- Business Manager Bridge: If you haven’t already, create a Facebook Business Manager account and link your ad account to it.
Step 2: Setting Up Your Payment Method
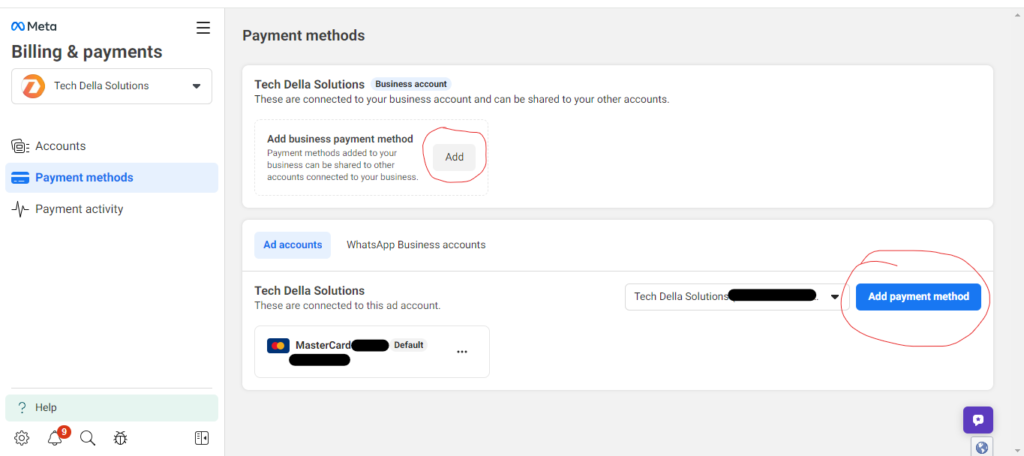
- Navigate to Settings: In Facebook Ads Manager, go to Settings > Billing > Payment Methods.
- Add Payment Method: Click “Add Payment Method” and choose your preferred option. Facebook allows you to select from several options, including:
- Naira Card: Select “Credit/Debit Card” and choose “Nigeria” as your country.
- Prepaid: You can pre-load your ad account before you start any ad campaign.
- PayPal: Choose “PayPal” and log in to your verified PayPal account.
- Enter Card Details (Naira Card)
- Verify Your Card: Facebook might send a one-time security code to your phone or email for verification.
- Set Currency: Choose “NGN (Nigerian Naira)” as your preferred currency.
Pro Tip
If you plan to scale up your presence on Facebook or if you have multiple advertising accounts, PSTNET service can make things easier for you. PSTNET provides the best virtual cards for Facebook Аds, Google Ads, TikTok Ads, Twitter, Bing, and all other advertising platforms.

You can issue an unlimited number of Visa/Mastercard virtual cards in dollars. Unlike some other virtual cards you’ll find online, PSTNET offers a simple registration.
As a matter of fact, you’ll get your first card without submitting any documents, and accessible top-up methods are available.
Get up to 100 free PST.NET Virtual cards every month!
You can also check out the PST Private program, which is currently active and offering 3% cashback on advertising expenses.
You’ll get up to 100 free cards every month, and just a 3% commission on top-ups!
Learn More Here
Step 3: Adding Funds to Your Account
- Prepay or Pay as You Go: Choose your preferred payment method:
- Prepay: Set a budget and deposit funds upfront. This ensures you never exceed your budget.
- Pay as You Go: Your card will be charged automatically as your ads run.
- Deposit Funds (Prepay Option): Enter the desired amount you want to deposit in NGN.
- Confirm and Submit: Review your payment information and click “Confirm” to add funds to your account.
Step 4: Running Your Ads
- Create Your Campaign: Design your ad campaign within your Facebook Ads Manager.
- Set Budget and Billing: Choose your preferred budget and billing method (prepay or pay as you go) from the options you configured earlier.
- Launch Your Campaign: Once satisfied, click “Launch” to start your Nigerian Facebook ad campaign!
What Payment Method Does Facebook Use?
Facebook itself doesn’t directly use any “one” payment method. Instead, it acts as a platform where advertisers can choose various payment methods to pay for their advertising campaigns.
These payment methods can be broadly categorized into three main types:
- Credit and Debit Cards: This is the most common option, available in most countries, including Nigeria. You can use Naira credit/debit cards from Nigerian banks like Zenith, GTB, and First Bank for Facebook ads.
- PayPal: While not officially supported by Facebook in Nigeria, some users have reported successful payments using verified PayPal accounts. However, proceed with caution, as limitations and fees might apply.
- Mobile Money: In some countries, including Nigeria, certain mobile money providers might offer integrated payment options for Facebook ads. For example, in Nigeria, MTN Mobile Money might be available as a payment method, depending on your account and campaign type.
Which Card is Accepted For Facebook Ads?
For Facebook Ads in Nigeria, you’ll be happy to know that most Naira credit/debit cards from major Nigerian banks are accepted:
- Zenith Bank
- Guaranty Trust Bank (GTB)
- First Bank of Nigeria
- Access Bank
- United Bank for Africa (UBA)
- Stanbic IBTC Bank
Additionally, you can add virtual USD cards. Just make sure there is at least $1 on the card.

Why is Facebook Rejecting My Card?
There are several reasons why Facebook might be rejecting your card for payment, and pinpointing the exact cause can be frustrating.
However, don’t worry! Knowing some potential reasons and troubleshooting steps can hopefully get your ads up and running.
Here are some possible reasons for Facebook rejecting your card:
Card Information Issues
- Incorrect Card Details: Double-check your card number, expiration date, and CVV code for any typos or mismatched information.
- Card Expired: Make sure your card is not past its expiration date.
- Insufficient Funds: Ensure your card has enough available balance to cover the ad campaign cost.
- Card Not Activated for Online Transactions: Some banks require you to activate your card for online payments. Contact your bank to confirm.
- International Transaction Limitations: Some cards have limitations on international transactions, especially if you’re using a Naira card for Facebook Ads outside of Nigeria.
Payment System Issues
- Temporary Facebook Outage: Sometimes, temporary technical issues with Facebook’s payment system can cause card rejections. Try again later or contact Facebook support.
- Bank Issues: Occasionally, your bank might have temporary issues processing online payments. Contact your bank to see if there’s any problem on their end.
Other Potential Causes
- Daily Spending Limit: Some cards have daily spending limits that might be exceeded by your ad campaign cost. Contact your bank to increase your limit if needed.
- Security Concerns: Facebook might flag your transaction as suspicious if it originates from a new device or location. Try using a familiar device or contact Facebook support to explain the situation.
What You Can Do
- Review your card details carefully
- Try using a different payment method if available
- Contact your bank to check for any limitations or issues
- Contact Facebook support for further assistance
- Check the Meta Business Help Center for known payment issues in Nigeria
Remember, the specific reason for your card being rejected will be displayed in the error message you receive from Facebook. Take note of the message and use it to narrow down the cause and find the appropriate solution.
